Create Custom Material in Substance Painter
- Leavariox Studios
- Feb 4, 2021
- 3 min read
Updated: Jul 5, 2023
A recent purchase I made at the end of the year was Substance Painter! I opted out of a subscription plan and have a stand alone version of Substance Painter itself. Although there are tons of different materials to choose from and I can create new ones out of existing content just by adjusting some parameters and settings, I also had texture maps that I had made or downloaded that I wanted to add into it.
The only problem was that I couldn't find much on how to really accomplish this. I saw ways to duplicate materials, import resources, create smart materials with custom settings, but to just add in texture maps and create a brand new material that I could manipulate later seemed impossible.
The general answer I found was that I needed to just use Substance Designer to create materials or download from Source, Share or another option. All of which are legit answers and a smart way to go if you want maximum customization of your materials.
That wasn't what I wanted at the moment though. I needed to create a material from a texture map I made. Luckily after a few videos, forums and documentation searching I was able to figure out how to go about doing just that!
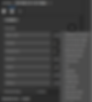
The best method is to open up Substance Painter and open one of the sample projects as this will give you an empty Layer to work with. Once you do that, import your resources "Texture Maps" that you want to bring in and label them as a texture. Whether you choose to save them to your shelf for all projects or just the active project is up to you.


Now that you have your maps brought in, you need to add them to the appropriate channel attributes of your layer. So if you have a normal, emissive, or any particular type of texture map you brought in, you will need to have them turned on.
Once you have all the channels turned on that you need, You can start dragging your texture files over. This is the easy part, you just navigate to your texture folder (If your imports aren't already showing from the import process) and drag the appropriate texture onto the correct field.
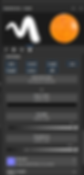
If you have a metallic map, you just drag it onto the box that says "Metallic", and continue to do that to all the fields you want to add a texture to. In some cases you may have a texture map but don't want to add anything to it. Metallic or Roughness would be a good example if you want to be able to manipulate those fields later on.
Once you have all your fields complete and the material looks the way you want it to, you can now save it to your material library.

Right Click the Material Mode and select "Create Material Preset". This will add it to your material library to be accessed anytime you open up Substance Painter.
The final step would be to rename it to what you want it called. Right click the material and rename the file.

If you also notice, you can make changes or export your material to other locations on the window above.
Now that we are complete we have a finished material you can drag start to add to your project!

Just like all materials, you can adjust the scale, rotation, and so on once you apply it to an object. Obviously you will want to make sure you have a seamless texture for that to work right along with your UV's mapped properly but that can be done in another program or on import of your object.